Connecting To Pythia
Researchers wishing to use Pythia must contact research.support@chicagobooth.edu to request access.
Note
Pythia requires users to be connected to a UChicago campus network or logged on to the Booth VPN (vpn.chicagobooth.edu).
Accessing Pythia requires having Booth credentials (i.e. Booth ID and password) and access to a Secure Shell (SSH) client.
- Connection Type:
ssh
- Host Name:
pythia.chicagobooth.edu
- Port Number:
22
Mac/Linux
Mac and Linux systems have a built-in Terminal that can be used to access Pythia. In these systems, simply open a Terminal window and type the SSH command at the prompt.
$ ssh <BoothID>@pythia.chicagobooth.edu
At the prompt, enter your Booth password. The screen will not show characters as you type your password.
Note
You must use your Booth ID, not CNET ID!
Windows
Windows users will need to first download a terminal emulator. The university’s IT Services provides support for the terminal emulator PuTTY which can be used as a Secure Shell (SSH) client. The official PuTTY download page can be found here.
Once downloaded, a connection to Pythia can be initiated by entering the host name, port number, and connection type.
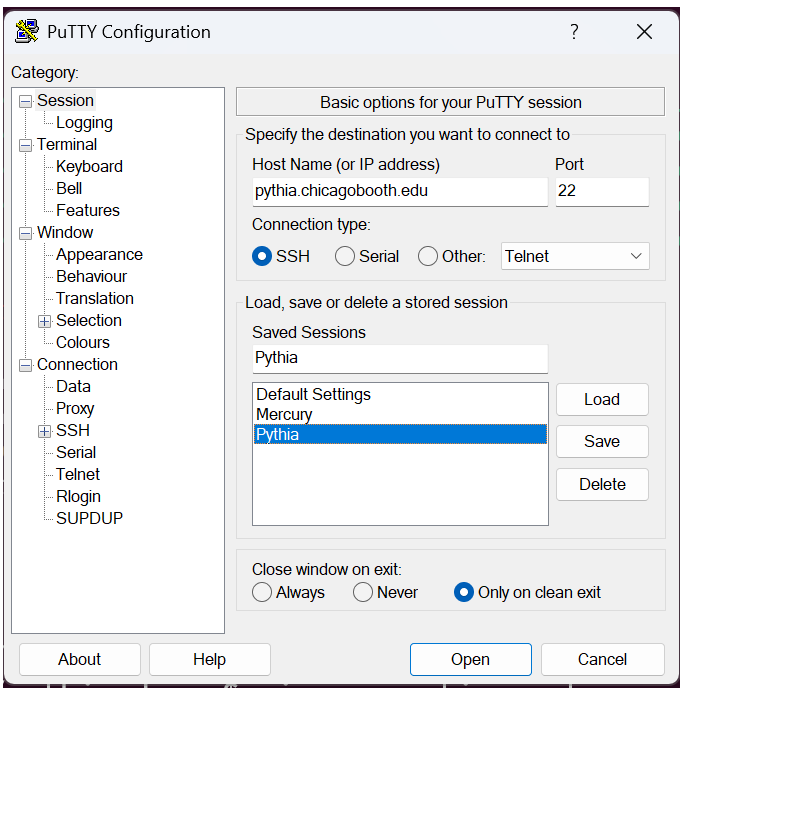
PuTTY configuration for initiating an SSH connection to Pythia
A new window will pop up where you can enter your Booth ID and password. You should then see Pythia’s welcome banner if the log in has been successful.
X11 Forwarding
On occasion, it may be useful to use X11 forwarding when using an application that provides a graphical interface. To do so, you may have to download an X server before connecting to Pythia. You can verify that X11 forwarding is working as expected by typing xeyes at a prompt. When X11 forwarding is working properly, a window will pop up with a pair of eyes that follow the mouse cursor as it moves.
Linux:
Log in to Pythia with X11 forwarding enabled
ssh -X <BoothID>@pythia.chicagobooth.eduTest X11 forwarding by typing
xeyes
Mac:
Install an X Server (e.g. XQuartz)
Click on Apple icon in top left of desktop and log out user; then log back in
Log in to Pythia with X11 forwarding enabled
ssh -X <BoothID>@pythia.chicagobooth.eduTest X11 forwarding by typing
xeyes
Windows:
Install an X Server (e.g. VcXsrv)
Enable X11 forwarding in Putty
From the left side menu, select Connection → SSH → X11
Check the box labeled X11 Forwarding
Click Open to log in to Pythia with X11 forwarding enabled
Test X11 forwaring by typing
xeyes
SSH keys
SSH Keys are automatically generated for each user upon launching their first interactive session on a Pythia compute node (i.e. via srun --account=<accountname> --pty bash --login).
SSH key authenication allows users to connect to the cluster without typing their password.
# log into a compute node (start an interactive session)
[pytfe02] $ srun --pty bash --login

# private key "id_ecdsa_booth" and public key are automatically created on Pythia
[pgpu010] $ ls  /home/${USER}/.ssh/
id_ecdsa_booth    id_ecdsa_booth.pub
Mac/Linux:
Copy the private key from Pythia to your local machine. Do this from your local machine.
# copy the private key from Pythia to your local machine
[laptop] $ scp <Booth_ID>@pythia.chicagobooth.edu:~/.ssh/id_ecdsa_booth ~/.ssh/id_ecdsa_booth

# create a symbolic link to the private key
[laptop] $ ln -s ~/.ssh/id_ecdsa_booth ~/.ssh/id_ecdsa
Try logging to Pythia. You should see the Pythia’s welcome banner without having to enter your password.
Windows:
If you installed PuTTY, you can copy the private key from the Windows Powershell with pscp command.
PS C:\Users\BoothID> pscp <Booth_ID>@pythia.chicagobooth.edu:/home/<Booth_ID/.ssh/id_ecdsa_booth C:\my_folder\ #copy private key to Windows C drive
Convert id_ecdsa_booth to id_ecdsa_booth.ppk with PuTTYgen
Launch Puttygen and click
conversions -> Import key(import id_ecdsa_booth saved in my_folder)Under
Actions / Save the generated key, selectSave private keyand save key as id_ecdsa_booth.ppk
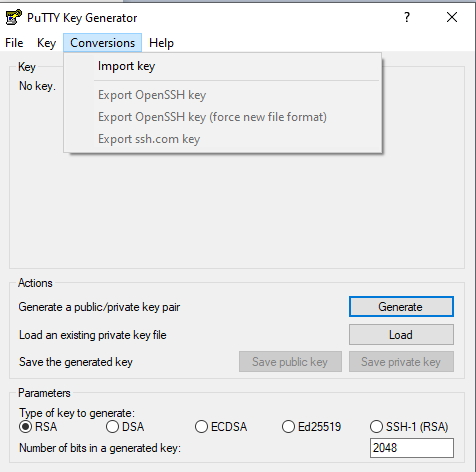
PuTTYgen import and convert private key id_ecdsa_booth to id_ecdsa_booth.ppk
Connecting to Pythia via PuTTY as described in the paragraph Connecting to Pythia-Windows and upload the private key id_rsa.ppk by navigating to
Connection> SSH > Auth, upload the key via thebrowsebutton underAuthentication parametersand clickopen.
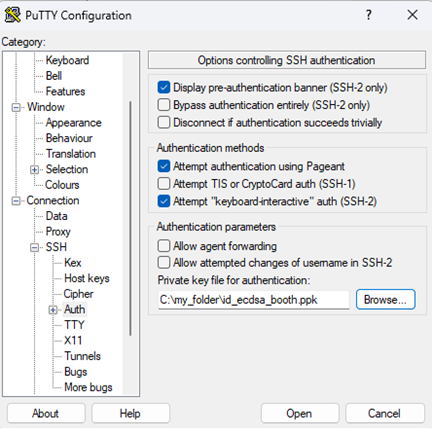
PuTTY configuration for connecting with ssh keys